Etch Quality
Etch is a type of quality designed to mark material without piercing it.

While Etch uses abrasive and water like cutting, the nozzle moves much faster across the material, marking the surface without piercing it. Etching works best on metals. Etching occurs at the top speed of the ProtoMAX, 100 in. per minute (2540 mm per minute). Advanced users can adjust to a slower speed using XData.
Applications
Some ways to use the Etching feature:
Consistently produce good results
- Create pilot holes. Use a tiny etch mark as a guide for drilling, reaming, or tapping.
- Create lines or arcs to use as a reference for a secondary process (such as bending a metal part).
Inconsistent results
These applications may need some experimentation.
- Part or tool marking: marking a part with information such as text.
- Artistic purposes, such as creating textures and designs on the surface of the part.
- Texturizing a surface with designs or patterns.

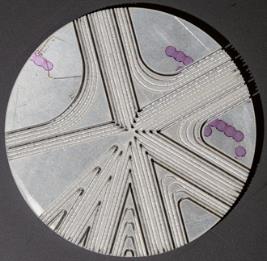
Example: etching grooves
This piece shows how Etch can be used for different functions.
- The four outside grooves make the part watertight when pressed against a gasket.
- The spiral in the center is meant for adhesive. By applying it to the center of the spiral, the adhesive will spread out across the surface with minimal chance of "spilling over."
- For each quadrant, a tiny etch mark was used to make a pilot hole for drilling.
Waterjet etching
Abrasive waterjet etching is not going to produce equivalent results to other processes such as milling, laser, or chemical etching. For many part marking purposes, a laser or other tools may often be a better choice. However, the waterjet produces results that have their own place, and is often quite useful for creating practical or artistic parts.
- Milling

- Chemical etching
- Laser
- Other OMAXmachines
Materials
While metal is recommended and has the least amount of risk, non-metal materials can sometimes be etched with a bit of experimentation. This table shows materials ranging from best to not recommended for waterjet etching.
| Etching | Material | Notes |
|---|---|---|
| Best | Metals | For a cleaner etch and less noticeable corner digging, use a hard metal like steel rather than a soft metal like aluminum. |
| Varying results | Stone | Stone can be etched in some cases. In other cases, it will chip or blast away into fragments. |
| Glass and other brittle materials | See Etching on brittle materials. | |
| Not recommended | Wood | Wood tends to cut or split. |
| Wood Laminates and composites | This type of material does not etch well. |
Etching on a ProtoMAX
An abrasive waterjet can do etching in an unrefined manner, where results can vary depending on many factors. It is important to know ahead of time what kind of results to expect, and plan accordingly. Often, some experimentation is required. Below are tips on how to make the most of etching on your ProtoMAX.
Abrasive type also makes a difference. For example, the Barton 85 HPX will do a cleaner job than the 80 HPX, a faster cutting, more aggressive abrasive.
Start etch in the scrap material
Some pitting will occur wherever the jet stream turns on or off. When the jet stream turns on and the pump stabilizes, it will dig into the material and create a pit or hole the diameter of the jet stream. Likewise, when the jet stream turns off, a similar pit will result as the pump cools down in preparation for traversing. This is a normal and expected behavior on ProtoMAX machines that one must consider when designing parts that contain Etch.
It is recommended that you start your etch away from what will become the part to avoid pitting that is not part of the design. While you certainly can start your etch in the part itself, please note that pits at the start and end of the etch can be so severe that they drill completely through the material.
Use radii instead of sharp corners
Because the machine cannot take sharp corners with infinite accelerations, it needs to slow down at corners for any entity in the tool path. This prevents excessive machine vibrations or motor faulting. As the machine slows down for corners and tight radii, the jet will dig deeper into the material, resulting in pits at corners.
Use radii instead of sharp corners to avoid pitting in corners where the machine would otherwise have to slow down. The larger the radius, the less the machine has to slow down. So the more even the etch will be.
This coin shows sharp corners as well as large radii. Notice the pitting in sharp corners.
Minimize accelerated wear
Be aware of increased noise and abrasive splash. The splash will cake the inside of your machine over time, and may accelerate the wear of all machine components, including fogging and sandblasting the clear ProtoMAX lid.
To minimize accelerated wear on the machine:
- Avoid lots of etches in a path.
- Use a nozzle muff to control the spray as it ricochets off material.
- Raise the water level high above the material.
Lots of on/off cycles can cause accelerated wear on high pressure components.
Too many small etch entities may cause the nozzle to clog.
Avoid using thin materials
The waterjet is an extremely powerful process. As such, etching on thin or soft materials can often result in cutting all the way through, ruining a part.
- Avoid using etch on soft or thin materials.
-
Unless the desired result is a deep hole or possibly a hole through the part, avoid using etch on entities smaller than 0.06 in. (1.52 mm). The beginning and ending will likely connect, cutting all the way through the part.
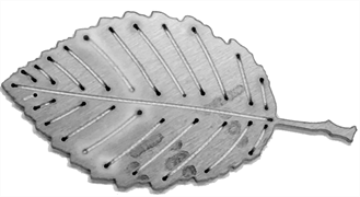
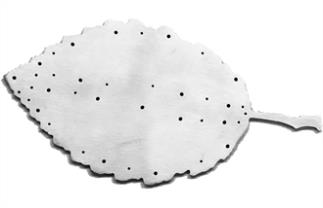
Aluminum etched leaf: The jet stream pierces through because this material is too thin.
Etching on brittle materials
Etching on brittle materials such as glass produces varying results. For example, the force of the jet stream might cause the material to crack or break. However, this type of material can etch well if it is thicker, more pliable, and well-supported. While you may not get a perfect result on the first try, we encourage you to experiment.
Cutting the shape
- When sequencing a path, consider doing the cut after all etches have been done. That way, the etching occurs on the part while it is firmly held in place.
- When cutting over an area that is etched, the edge of the cut will not be as smooth, because the etched area will disturb the jet stream.
- For parts with many etch entities that run off the side, there might be some resistance in separating the part from the scrap. Try selecting Quality 3 instead of Quality 2.

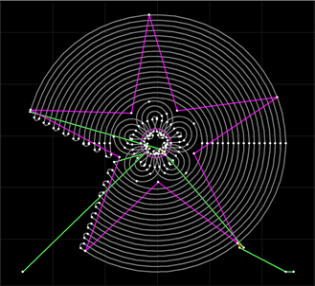
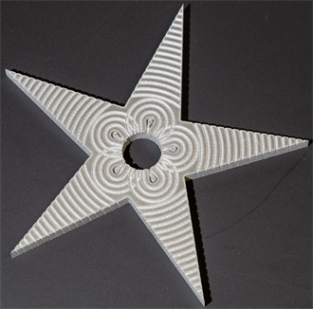
Etched star
This five-pointed star shows examples of several tips mentioned above.
- To reduce wear on high-pressure components, there are only two sequences of etch in order to keep the pump/nozzle on the entire time. It also speeds up the overall etching process by not having to cycle the jet stream on and off.
- The start/stop points are done in the scrap material. Note also that the jet stream is turned on and off in the scrap portion of the part. This helps prevent the "pit" that can otherwise occur at the start and end of each etch.
- This design avoids etching sharp corners or small radii.
- There are places where the etch crosses over previously etched areas. The etch will be deeper where etch lines cross.
Sample etch files can be found in ProtoMAXLAYOUT in Samples\Tutorial_and_examples\Etch.