Replace the Abrasive Tubing
The abrasive feed tube is a consumable item and wears as the abrasive flows from the garnet abrasive hopper to the nozzle body. Cracks, chips, holes, or other damage at the nozzle entrance, hopper exit, and bends along the tube can compromise the abrasive flow to the nozzle. See the Maintenance Schedule for the recommended frequency for this task.
| 1. | Open the lid and lock it in the upright position. |
Use care when opening or closing the lid to avoid injury. Never let the lid free-fall. Keep hand, fingers, or body parts away from the side of the table when closing the lid.
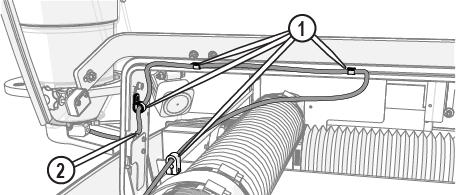
| 3. | Remove the old abrasive tube from the tube clamps [1] and the roll bar [2] and discard. |
Do not cut the abrasive feed tube. The abrasive tube is cut the length required for optimal abrasive delivery. Only use OMAX feed tube kits.
| 4. | Route the new abrasive tube from the abrasive hopper through the roll bar [2] and tube clamps [1], ensuring the abrasive tube is routed behind the cutting deck light, to the nozzle (Figure 889). |
Make sure there are no kinks in the abrasive feed tube or excessive bends along the route. Make sure there is enough slack in the abrasive tube between the connections so that the tube does not disconnect during operation.
| 5. | Insert the abrasive tube into the abrasive feed block [1] and the nozzle [2] (Figure 888). |
| 6. | Close the lid. |
| 7. | Perform a nozzle test, see Test the Nozzle. |


