
________________________________________
XData Command Reference
Assigns XData functionality to selected drawing entities using the Assign XData pull-down window.
Important Notes
Be sure to read the XData Overview section for important information and notes concerning XData. Commands marked "[Hidden]" will not appear on the Choose Command drop-down menu unless "Show advanced XData items" is checked:
Some XData items have "Start" in their name. For these, XData is applied for all entities that follow until either the corresponding "End" XData is encountered, or the end of the path is hit. XData items that do not have "Start" in them are applied for the entity only, and do not propagate down the path. Also note that XDatas that "Start" something also have a green colored glyph.
Index of XData Items
[Number in brackets] represents the code number used to store the XData item in an OMAX OMX file, which is listed here for ease of reference for those writing software to output OMAX OMX files.
Speed and Pause Commands
Tool Offset Commands
[039] – [Advanced] Set tool offset value
[040] – [Advanced] Modify tool offset amount
[041] – [Advanced] Clear offset overrides
Comments and Text Attributes
Misc.
XData Commands in Numerical Order
The numbers next to each XData item indicate the code number used to categorize the XData item within the software and OMX file, which is what one would use when generating OMAX files, such as through a post processor or script. (In LAYOUT or MAKE, one would typically ignore these numbers.)
XData commands marked "advanced" only appear if “Show advanced XData Items” is checked in the XData LAYOUT dialog.
[000] – No Data
No XData is assigned. This is the default condition for all entities when no other XData item has been assigned.
To remove XData from an entity, simply set its XData to be "No Data".
[002] – Comment on Entity
This XData item allows a comment to display on entities in the LAYOUT drawing or tool path. This can be a useful way to convey a message to another user.
As with any XData item, the user must have XData display enabled in order to see it.
[006] – Pause
If an entity has "Pause" assigned to it, the controller will come to a full stop precisely at the start of the entity, and it's up to the operator to press "Continue" should they wish to. This is useful as a way to put in a programmed stop point for purposes such as re-fixturing the material.
The pause will occur at the exact location specified (the starting point of the entity with Pause assigned). Compare this with the Insert Pause command in MAKE, which is not exact.
When a Pause occurs, the jet and other relays will shut off, similar to as if the "Pause" button were pressed.
Unlike the “Insert pause point here” command in MAKE, this commanded XData is precise, and will pause at the precise location specified, which is the start of the entity for which this XData item was assigned.
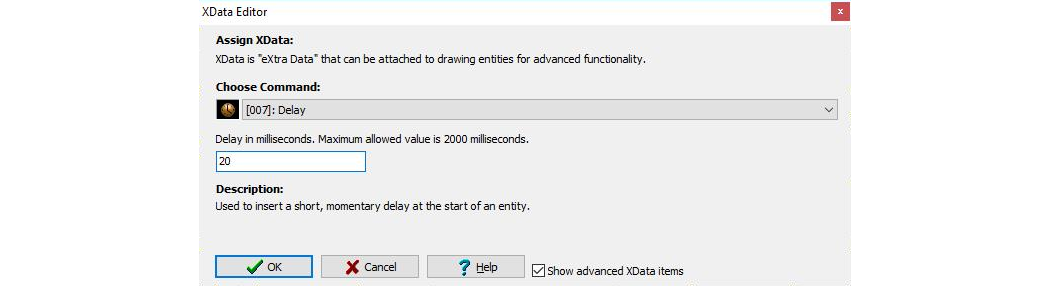
[007] – Delay
One can insert up to a 2 second delay where the machine will come to a stop, delay the specified amount of time at the start of the entity, and then resume running the path. Delays are limited to a maximum of 2 seconds (2000 milliseconds). Delay time is specified in units of milliseconds (1/1000 of a second).
[039] - [Advanced] Set to Offset Value
Parameters: Tool offset distance
Forces the tool offset to the specified amount. This command can be applied only to leads and traverses.
XDatas are applied at the START of an entity, and for this command, it is a Traverse. Since it applies to the start, it also effects the prior entity because the prior entity must match the desired offset of the entity that you are on. If you have a cut quality entity and then a traverse, and you put this command on the traverse, the preceeding cut will also be affected. It is suggested to use this XData command only when connected to traverses or leads where such modifications will not cause conflicts. If necessary, consider dividing your traverse in half and assign this XData to the second half only.
When using XData to override the tool offset amount, it is possible to cause blemishes at the lead locations if the leads are shorter than the offset amount. (This is typically an issue only when working with exceptionally large offset amounts.) To avoid this issue, draw your lead in and lead outs such that the ends of them that connect to the traverses are beyond the area where the offset will occur (so draw them longer than you might normally).
This XData item is only applied when a tool offset other than zero is entered by the operator. If a tool offset of 0 is used, then no offsets, and no offset overrides are used at all.
[040] - [Advanced] Modify tool Offset Amount
Parameters: Tool offset distance to add or subtract (if negative)
Modifies the tool offset by the specified amount. This command can be applied only to leads and traverses.
XDatas are applied at the START of an entity, and for this command, it is a Traverse. Since it applies to the start, it also effects the prior entity because the prior entity must match the desired offset of the entity that you are on. If you have a cut quality entity and then a traverse, and you put this command on the traverse, the preceding cut will also be affected. It is suggested to use this XData command only when connected to traverses or leads where such modifications will not cause conflicts. If necessary, consider dividing your traverse in half and assign this XData to the second half only.
[041] - [Advanced] Clear Offset Overrides
Parameters: None
Removes any changes to the tool offset made by commands [39] and [40].
XDatas are applied at the START of an entity, and for this command, it is a Traverse. Since it applies to the start, it also effects the prior entity because the prior entity must match the desired offset of the entity that you are on. If you have a cut quality entity and then a traverse, and you put this command on the traverse, the preceeding cut will also be affected. It is suggested to use this XData command only when connected to traverses or leads where such modifications will not cause conflicts. If necessary, consider dividing your traverse in half and assign this XData to the second half only.
