
________________________________________
Divide
Divides an entity into two parts
The mouse wheel can be used to zoom-in and zoom-out while using this command.
Right-click Commands
Right clicking the Divide button provides the following command options.

Keyboard Shortcuts
I - Find intersection and divide
Shift+I - Divide at nearest intersection
Ctrl+I - Divide all elements touching
J - Join 2 entities
The Divide command divides an entity into two separate entities. This can be useful to remove part of an entity from a drawing. Also use Divide to extend an existing entity.
The Divide command can also join together two entities. These can be two entities that were separated as a result of another command, or two entities that have a short gap between them.
Divide at Nearest Click
Divide at nearest click divides an entity at the location closest to where you clicked.
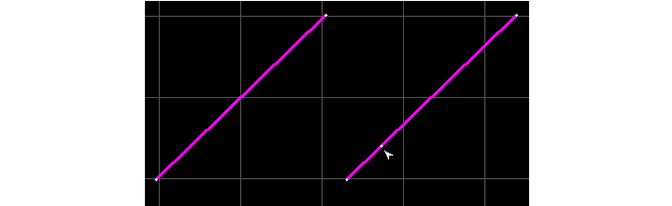
The line on the right is divided at the click location
After this command is selected, the cursor changes to a small arrow, and a snap toolbar appears. Then click on or near the entity to specify where it's to be divided, or use a snap to choose the location to be divided.

The Divide snap toolbar
After dividing the entity, the cursor changes back to a magnifying glass.
Right-click on the button, and "Divide at nearest click" is automatically selected.
Divide at Specified Distance From Endpoint
The "Divide at specified distance" command lets you divide entities at a specific distance from an endpoint.
After choosing this command, a dialog box appears with how far from the endpoint you want to divide each entity you select. (The distance is always in the default units you selected.)

The distance from the endpoint to divide each entity
In the example show above, each entity you click will be divided 0.5 in. from the closest endpoint. You can continue choosing entities without reselecting the command.
If you hold down the key when you click, you will also erase the segment closest to the end point.
Divide into Equal Sections
The "Divide into equal selections" command lets you divide selected entities into a specified number of equal sections.
After choosing this command, a dialog box appears showing how many sections an entity will be divided into when clicked. Enter the number of divisions wanted.

The number of sections to divide each selected entity
In the example show above, each entity clicked will be divided into 4 sections. Each section will be of equal length.
Divide at Nearest Intersection
The "Divide at nearest intersection" command finds the closest intersection of a chosen entity and divides both the chosen entity and the entity it intersects with at the intersection point.
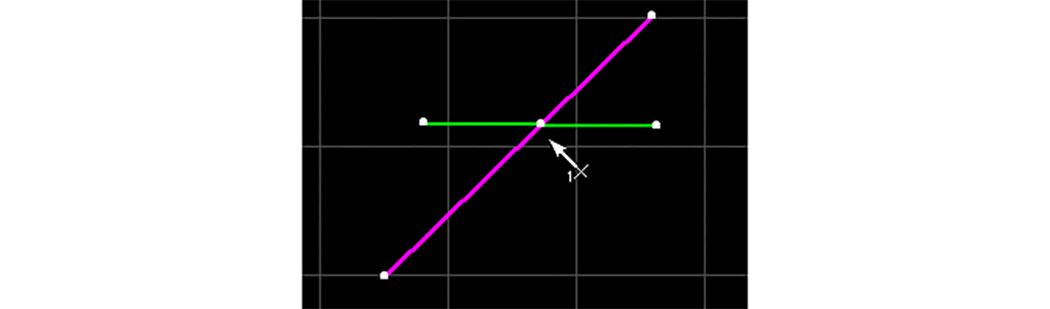
Both the purple and green lines were divided at their intersection
After choosing "Divide at nearest intersection," click the entity to be divided at the intersection. If the entity has more than one intersection, the closest one is chosen - be careful where you click.
You can also choose Divide and the Intersect snap to divide both entities at the nearest intersection. Use whichever method you find easier.
The two entities do not have to be joined. LAYOUT will extend the line or arc to the imaginary intersection. If the intersecting entity is an arc, the curvature of the arc is continued and the first location where it intersects is divided. In this case, of course, the "imaginary" line is not divided.
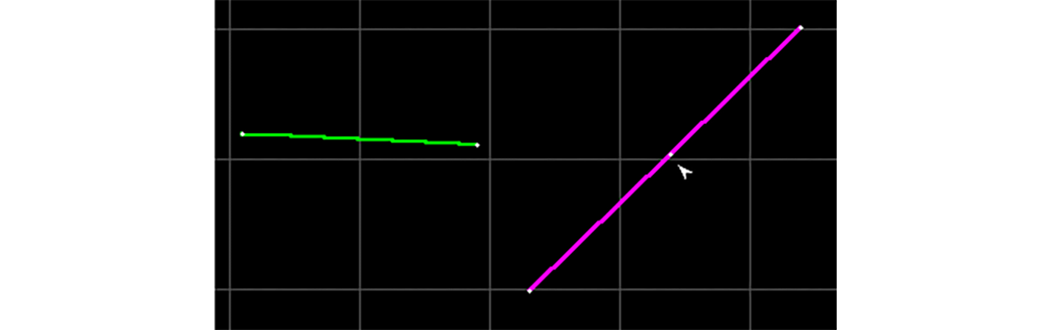
The purple line is divided where it would intersect the green line, if the green line were extended
If there is no intersection (real or imaginary) between the two entities, nothing happens.
Note that the two entities chosen are the two closest to the point where you click. If there are several entities nearby, you'll need to be careful about where you click, as LAYOUT may select a different set of lines than you think you are selecting. It is usually safest to click directly on the intersection.
Find Intersection and Divide
The "Find intersection and divide" command divides two entities into separate entities where they intersect. This command is very similar to "Divide at nearest intersection," except that with this command, both entities are chosen.
The two entities do not have to be joined. LAYOUT will extend the line or arc to the imaginary intersection. If the intersecting entity is an arc, the curvature of the arc is continued and the first location where it intersects is divided.
If there is no intersection (real or imaginary) between the two entities, nothing happens.
How to Use Find Intersection and Divide
1) Right-click the button and choose "Find intersection and divide" from the pop-up menu that appears.
LAYOUT prompts you to pick the first entity on the intersection.
2) Click the entity, and LAYOUT highlights it in blue.
LAYOUT then waits for the second entity on the intersection to be picked.
This is the intersecting entity. This entity should have an intersection with the first entity (real or imaginary).
3) Verify that LAYOUT divides both entities at their intersection.
Divide all elements touching
The command divides all entities that intersect the chosen entity. At each location where the chosen entity crosses another entity, both entities are divided.
In the figure below, the top green arc was chosen (remember that a circle is actually two arcs). The white dots show the division locations. At each of these locations both the green arc and the purple entities were divided.
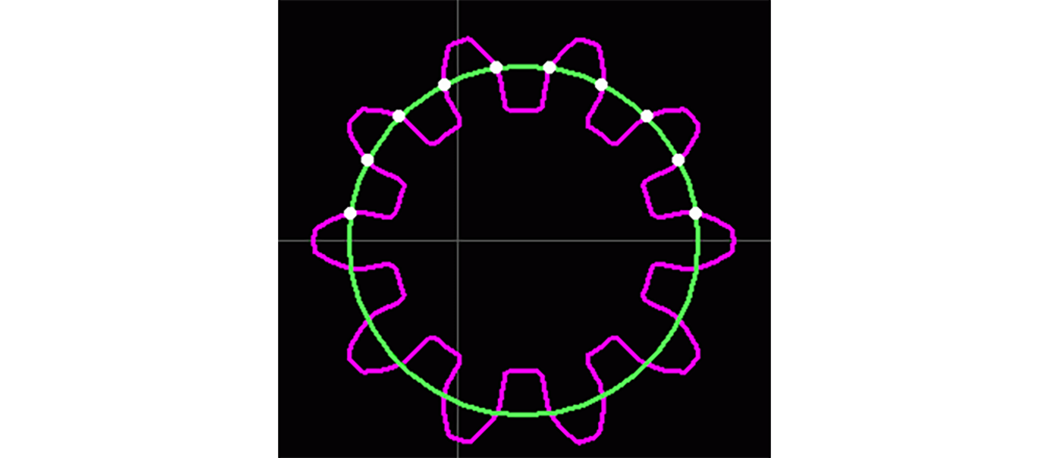
The top green arc was chosen
This command remains in effect after you choose an entity, allowing you to easily choose a number of different entities. To end the command, press .
Divide all selected elements
The Divide all selected elements command divides all selected entities at every intersection they have with other entities. All intersections are used, even if the selected entity intersects with a non-selected entity. Both the selected entity and the intersecting entity are divided.
In the following figure, the yellow (selected) line divided at five locations, shown by the flashing red dots. The intersecting entities were also divided.
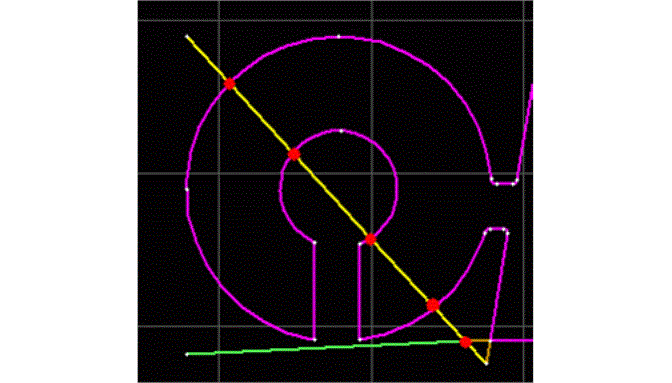
The flashing red dots show where both the selected line and the intersecting entities were divided
Join 2 Entities
Use the "Join 2 entities" command to join together two separate entities. Two basic types of entities can be joined:
• An entity that was previously divided
• Two separate entities that have a gap between them
When joining an entity that was previously divided into two entities, the overlapping endpoints are removed. (When the entity was divided into two entities, an endpoint for each entity was created at the division point.)
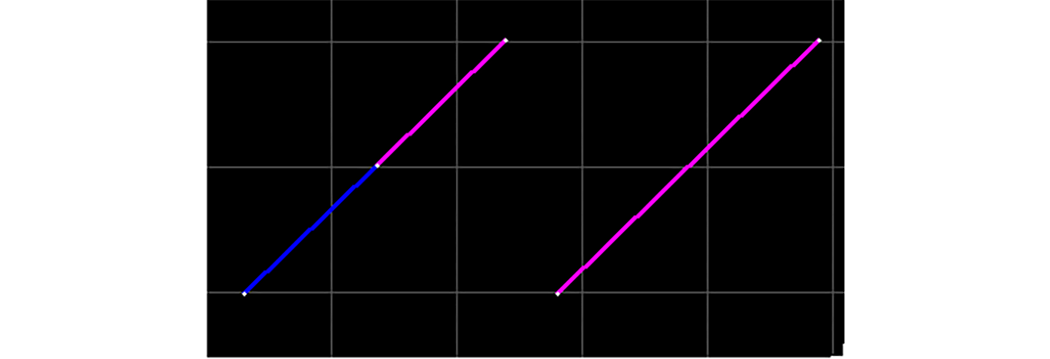
The line on the left was joined to become the line on the right
If there is a gap between the segments, the line that you click on will slice off any "extra" from the line it intersects. If the results of the Join command are not as expected, use the Undo command to restore the original disjoined lines.
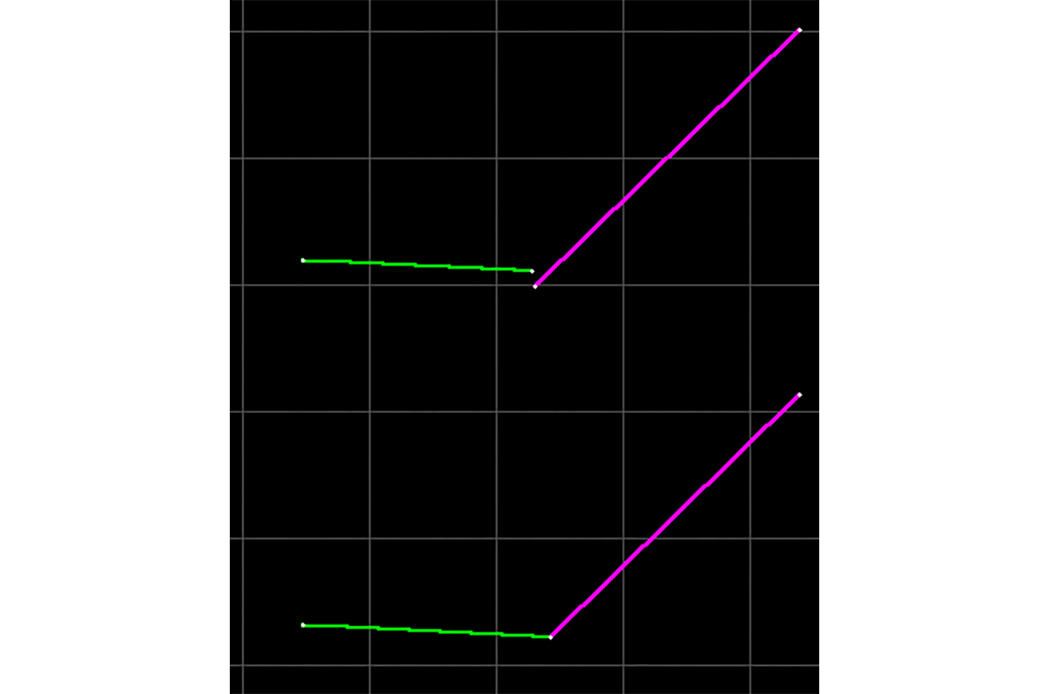
The two lines on top were joined together on the bottom. Note that the green line was lengthened, and the purple line was shortened.
You can also use the Fillet command with a radius of zero (0) to join two entities. This has the added advantage that it extends the two entities to their intersection point, instead of simply moving one of the endpoints on top of the other.