
________________________________________
Circle
Draws a circle that consists of two arcs
Circles consist of two arcs whose endpoints adjoin each other. The arcs are always considered separate entities--to perform an action on the circle (such as moving it), both arcs must be selected. The center of the circle, however, corresponds to the center of either arc.

Each "A" in a circle points to the endpoint of the two arcs that form the circle
If you want to draw an arc, first draw a circle. A circle consists of two arcs, so you can delete one of them and work with the other one.
Right-click Circle Commands

How to Draw a Center-Radius Circle
The mouse wheel can be used to zoom-in and zoom-out while using this command.
A "Center-Radius" circle is one where you specify the following two points:
• From: The center of the circle.
• To: A point on the circle (or the diameter)
This method is automatically chosen if you left-click the button.
1) Left-click the button.
The toolbar appears. These tools let you specify where the center of the circle will be.
You can also click the left mouse button anywhere on the drawing to specify where you want the center of the circle.

The Snaps toolbar
2) Specify the location of a point on the circle, using the toolbar or the Specify Circle Attributes dialog.
After specifying the starting location, a light blue circle will follow the cursor to indicate the size and location of the circle.
You can click the left mouse button to draw the circle. Press Esc if you want to cancel drawing the circle. The size of the circle may also be entered in the Specify Circle Attributes dialog. You have the choice of entering the diameter, radius, or the circumference. Press C, and the cursor will jump to the "Circumference" box.
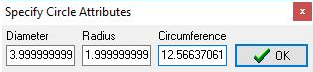
You can specify the circle dimensions using this dialog
3) Verify the circle was drawn.
How to Draw a Two-edge Circle
The mouse wheel can be used to zoom-in and zoom-out while using this command.
A "Two-edge" circle has two points that you've specified which lie on the circle. This is useful for drawing a circle that exactly fits between two other parts. This command is the same as drawing a line between two points, then drawing a circle centered at the middle of the line, and ending at the end of the line.
1) Right-click the button and select 2 Edge Circle.
The toolbar displays. Use these tools to specify where the one of the points on the edge of the circle will be.
You can also click the left mouse button anywhere on the drawing to specify a point on the circle.
2) Specify the location of a second point on the circle using the toolbar.
After specifying the starting location, a light blue circle follows the cursor to indicate the size and location of the circle.
You can click the left mouse button to draw the circle. Press Esc if you want to cancel drawing the circle.
3) Verify the circle was drawn.
How to Draw a Three Point Circle
A "Three Point" circle is drawn by specifying three points on the circumference of the circle. The Three Point circle command can also be activated with the shortcut key.
1) Right-click the button and select "3 Point Circle."
The toolbar appears. These tools let you specify where the first point on the circumference of the circle will be.
You can also click the left mouse button anywhere on the drawing to specify the first point. You can press Esc at any time to cancel drawing the circle.
2) Specify the location of the second point using the toolbar.
After you specify the starting point, a light blue circle will follow the cursor to indicate the size and location of the circle.
You can also click the left mouse button specify the second point.
3) Specify the location of the third (and final) point using the toolbar.
You can also click the left mouse button specify the third point.
4) Verify the circle was drawn.