STORING ProtoMAX FOR LONGER THAN ONE MONTH
| 1. | Follow the shutdown procedure (see 401434 Operation, ProtoMAX and the ProtoMAX Shutdown video, located at knowledgebase.omax.com ). |
| 2. | Follow the Clean the ProtoMAX procedure (see 401440 Maintenance, ProtoMAX and see knowledgebase.omax.com, search for "clean"). Continue with the instructions. |
The results from searching “clean” include the following primary tasks to clean the ProtoMAX.
- Remove the Accumulated Garnet
- Clean the Garnet bins
- Clean the Lid
- Clean the Cutting Stage
- Clean the Cable Track
- Clean the Catcher Tank Filters and Drains
- Clean the Catcher Tank
- Clean the Frame
- Clean the Side panels
Drain the Water Filter Tank
Drain the water filter tank (See 401527 Drain Water Filter Tank, ProtoMAXand the Clean the Drain Water Filter Tank video or401657 Drain Water Filter Tank, ProtoMAX, CE. and the Drain Water Filter Tank CE Guide video, located at knowledgebase.omax.com).
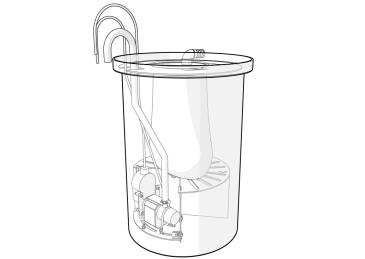
Figure 977
Store the Nozzle
| 1. | Disconnect the abrasive feed tube from the nozzle assembly. |
| 2. | Remove the nozzle assembly [2] from the inlet body [1]. |


Figure 978
| 3. | Remove the last chance filter and discard. |
The last chance filter is a consumable item and must be replaced when reactivating the ProtoMAX .
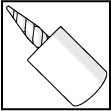
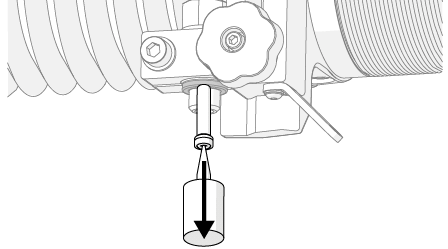
Figure 979
| 4. | Remove the mixing tube [2] and orifice [3] from the nozzle body [1]. |
Figure 980
| 5. | Clean the nozzle body, mixing tube and orifice with white vinegar using an ultrasonic cleaner. |
| 6. | Use clean, dry, compressed air to blow out the remaining moisture from the nozzle components. |
| 7. | Store the nozzle components in a closed drawer/tool box to prevent contamination. |
| 8. | Plug the end of the inlet body [1] with a plastic cap or plastic bag. |

Figure 981
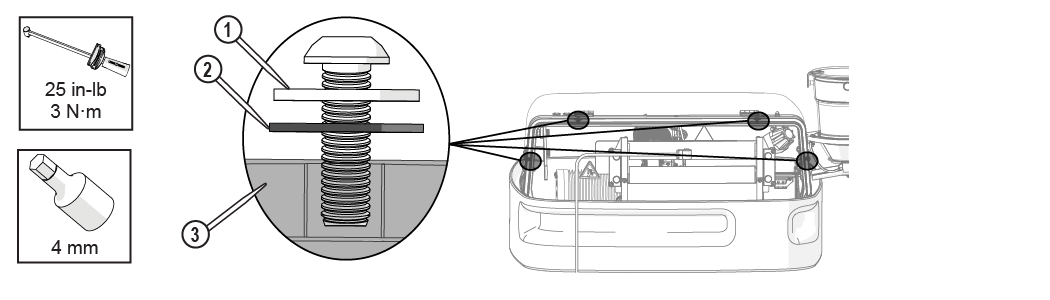
Clean Table and Rear Components
| 1. | Remove the screws and washers [1] securing the rear lid and set aside. |
![]()
Figure 982
| 2. | Lift the rear lid up, then slide it down the high-pressure plumbing to the floor. |
To prevent scratches to the lid, place it on a soft surface.

Figure 983
| 3. | Rinse off accumulated abrasive and other particles from the components and table inside the ProtoMAX. |
Avoid spraying the black X and Y motor covers. Use a damp microfiber cloth to wipe off the motor covers. Spraying the motor covers with water may cause leakage into the motor housing which could lead to premature wear of the motor housing and cable connections


| 4. | Reattach the rear lid and secure with the screws and washers (x 4). |
To prevent damage to the lid [3], ensure the rubber washer [2] is placed between the lid and the metal washer [1]. Do not overtighten the screw.
| 5. | After cleaning the catcher tank and interior components, use a wet/dry vacuum to remove remaining water. Leave the water drained. |
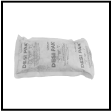
| 6. | Place humidity absorbing (desiccant) packs in the tank. |
Use sufficient number of packs for an approximate 11 cubic feet of enclosed tank and lid area (2 bags).
Clean the Hopper
| 1. | Disconnect the abrasive feed tube [1] from the abrasive orifice. Leave it hanging from the roll bar. |
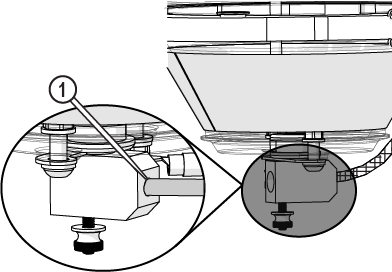
Figure 985
| 2. | Use clean, dry, compressed air to blow abrasive out of the abrasive feed tube. |
| 3. | Remove the hopper splash guard. |

Figure 986
| 4. | Remove the hopper ground strap [1]. |

Figure 987
| 5. | Remove the hopper assembly [1] including the hopper feed block [2] from the hopper support plate [3]. |
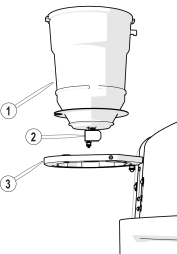
Figure 988
| 6. | Completely empty and discard the abrasive from the hopper assembly. |
| 7. | Remove the abrasive feed block [1] from the hopper assembly. |
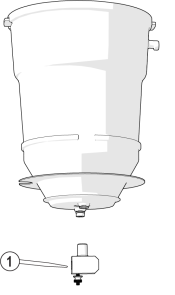
Figure 989
| 8. | Wipe out the hopper assembly with a clean, dry cloth. |
| 9. | Use clean, dry, compressed air to completely blow out all debris, clumps, or clogs from the abrasive feed block. |
Remove Water
Remove the water from the system if the ProtoMAX is inactive for more than a few months (summer or semester break) and/or over a winter break where there is any chance of temperatures below 32 °F (0 °C).
Remove the Water Filter
See 401440 Maintenance, ProtoMAX, and the Change the Water Filter video, located at knowledgebase.omax.com.
Discard the used water filter and replace with a new filter when taking the system out of storage. Remove all water from the filter canister.
Blow Out Water from the Low-Pressure Manifold
| 1. | Loosen the band clamp [1] from the hose on the incoming water supply and remove the hose. |
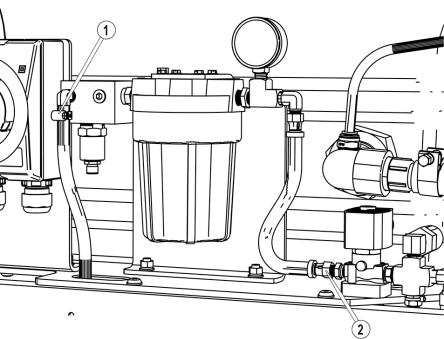
| 2. | Disconnect the hose [2] (Figure 990) from the solenoid valve and put the loose hose end in a bucket. |

| 3. | Blow clean, dry, compressed air into the manifold inlet [1] and blow water through the plumbing and into the bucket. |
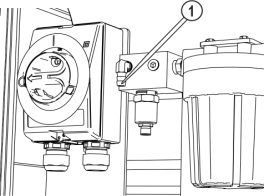
| 4. | Reconnect the hose to the incoming water supply (Figure 990). |

| 5. | Reconnect the hose to the solenoid valve(Figure 990). |
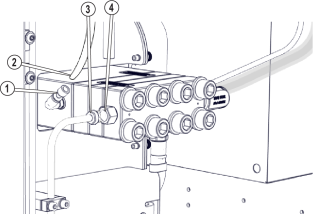
Blow Water Out of the Pump
| 1. | Disconnect the high-pressure components (see 401440 Maintenance, ProtoMAX and the Prepare the Pump for Maintenance video, located at knowledgebase.omax.com). |
| 2. | Use clean, dry, low pressure (45 psi) compressed air to blow out cooling water at port [1]. |
Do not exceed 45 psi when blowing out air from this port. Using air pressure higher than 45 psi may dislodge interior seals and O-rings.

| 3. | Use clean, dry, high pressure (90 psi or more) compressed air to blow out water at port [2] (Figure 992). |
Install Caps
It is very important to cap all openings. Uncovered openings may allow contaminants into the system. No ports or hoses should be left uncapped.
Install caps or block the openings on all hoses, tubing, and ports that are exposed to the environment (Figure 993) and (Figure 994).
| [1] Outlet cooling port | [2] Outlet cooling hose |
|
[3] High-pressure tubing |
[4] High-pressure port |
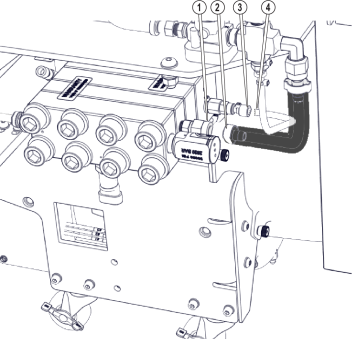
| [1] Incoming water port | [2] Incoming water hose |
|
[3] Inlet cooling port |
[4] Inlet cooling tubing |
Reactivate the ProtoMAX Machine
Follow the ProtoMAX install and start-up procedures to reactivate the machine (see 401420 Installation, ProtoMAXand the Install the ProtoMAX video, and 401434 Operation, ProtoMAX and the ProtoMAX Startup video, located at knowledgebase.omax.com).