Flush the High-Pressure Plumbing
Flushing the high-pressure plumbing system makes sure there is no debris in the high-pressure plumbing that can clog the nozzle during operation.
To avoid injury or damage, make all water and high-pressure connections before continuing. Contact OMAX Technical Support if needed
| 1. | Remove the nozzle body [2] and the nozzle filter [1] from the inlet body. Discard the nozzle filter. |


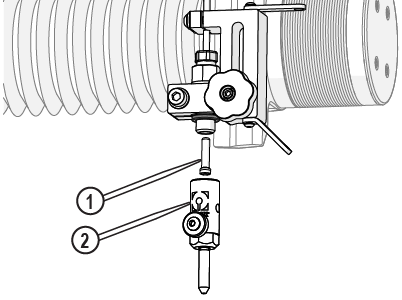
Figure 920
Hold the inlet body when loosening the hand knob. Do not let the inlet body fall and strike the cutting deck slats. Damage to the inlet body can occur, which can cause leaks.
| 2. | Loosen the Z-axis [1] and lower it to the lowest position. |

| 3. | Close the lid. |
Use care when opening or closing the lid to avoid injury. Never let the lid free-fall. Keep hand, fingers, or body parts away from the side of the table when closing the lid.
| 4. | Open the main water source, if needed. |
| 5. | Push the button [1] on the water filter to release the air. |
Place a rag over the top of the water filter to prevent water from spraying.

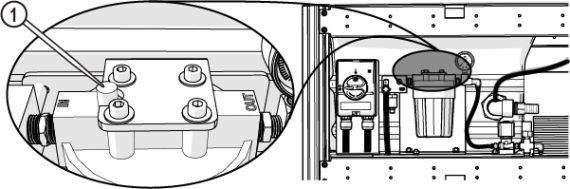
Figure 922
| 6. | In MAKE, use the X, Y Jog buttons [1], or the keyboard arrow keys to position the nozzle between two slats in the center of the cutting deck. |
![]()
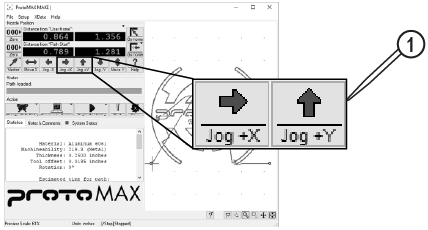
Figure 923
| 7. | Click Test [1]. |
![]()
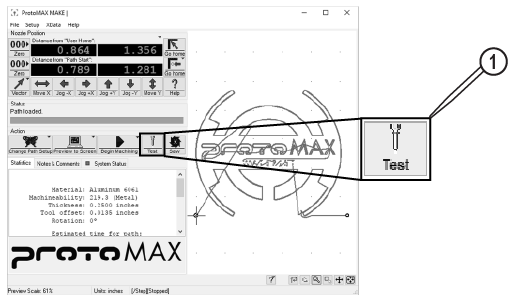
Figure 924
| 8. | In the Test Operations dialog box, select Flush plumbing, click Next. |
![]()
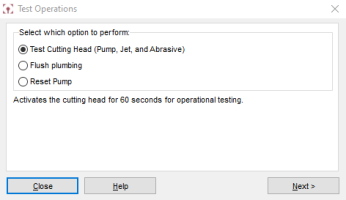
Figure 925
Keep a minimum of 16 in. (40 cm) away from pressurized equipment during operation. Do not try to tighten ultra-high-pressure (UHP) fittings while the system is under pressure. Do not touch or rub suspected high-pressure plumbing leaks. Rubbing or touching suspected high-pressure leaks can result in injury. If a leak is found, shut down the machine, then fix the leak before continuing. Never attempt to fix a leak while the ProtoMAX is running.
| 9. | Click Start Flush. |
The flush test runs for 30 minutes. The pump cycles on and off during the test operation, but water still flows. The test automatically stops after 30 minutes.
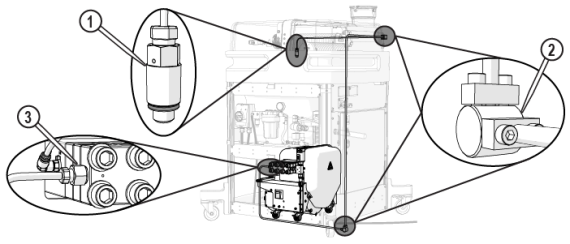
| 10. | Check the high-pressure plumbing for leaks at the nozzle [1], high-pressure fittings [2], and pump connection [3] during the test operation. |
| 11. | Click Close when the flush is complete. |
| 12. | Wipe off the inlet body threads and the bottom surface of the inlet body before installing the filter and nozzle assembly. |